
Free Barcode Label Printing Software for Pharmacy Medicines
Print Barcode Labels for Pharmacy Medicines with options for batch identification, expiry dates and other label information. This guide covers downloading, installing, entering medicine records, previewing, printing and customizing labels.

Pharmacy Barcode Label Printing
- Useful for medical stores and distributors.
- Useful for different manufacturing industries.
- Barcode-label design customization is available, including the original guide's “360 degree customization” claim.
- Labels can display relevant medicine and pharmacy details, subject to the chosen template.
Pharmacy records and printed labels must be checked for correct medicine, batch, expiry, price and legally required information before use.
Download the Free Pharmacy Label Software
Select the original download image below to open the provided Google Drive setup link. The original instructions describe the software as intended for Windows PCs, laptops and desktops.
What you need
- A Windows PC, laptop or desktop.
- The downloaded Barcode Label Software Pharmacy setup package.
- A printer and labels suitable for your intended format.
- Optional: Crystal Reports 8.5 for existing label report editing.
The exact Windows versions supported are not specified in the supplied guide. Verify compatibility before installation.
Install and Open the Software
- Download the setup file from the image above and install Barcode Label Software Pharmacy.
- Install the Ketan_Support setup found inside the Setup folder within the Barcode Label Software Pharmacy folder.
- Check your desktop for the Barcode Label Software Pharmacy icon.
- Double-click the desktop icon to start the software.
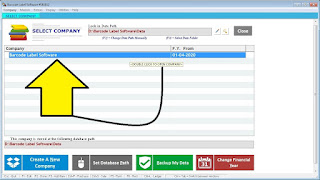
- When the company selection appears, use the existing “Barcode Label Software” company. Do not create a new company, according to the original guide.
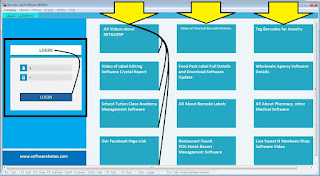
- Log in using the setup's documented default credentials: User ID: 1 and Password: 1. Click Login, then view the software dashboard.
Installation note: The default login above comes from the original software instructions. If the application allows it, change default credentials before storing real business or customer data. Only install software from sources you trust.


Thank you for downloading the software.
Video: Download, Install and Operate
The full video demonstrates the original software setup and operation. For report editing, the original page also provides Crystal Report 8.5 as an additional utility.
Create or Edit a Medicine in Item Master
From the dashboard, click Items or press Ctrl + I to open the Medicine Master / Item Master screen. The examples cover tablets, capsules, vials, syrups, surgical products and other medicine items.


- Click New to create a medicine record. To edit a saved record, double-click the item in the list.
- Search the existing list by entering a name in the Filter box.
- After completing each field, press Enter. The original guide warns that pressing Tab or clicking past fields may not save entries correctly.
- Enter the medicine and label details below; continue pressing Enter to move between fields.
Medicine Master Fields
Enter the medicine or product name.
The original example skips this field.
The original example leaves this blank and presses Enter.
The original example selects “Tax Free” and presses Enter. Verify the correct tax treatment for your product before using it in commercial records.
Click the pen icon, edit the existing name to the name you want printed on labels, click Update and press Enter.
Use the pen icon to edit the contact phone number, or enter another fixed detail intended for the label footer.
Use the plus (+) button beside these fields to add more entries, then press Enter to continue.
Select the default unit value, then press Enter.
Tick this checkbox to display the Batch entry field in the price details line, then press Enter.
Enter the relevant product batch. The original guide says it can be skipped or removed from view via Item Master Settings > Sub Item Master; batch information should not be omitted where required.
Enter the medicine expiry in MM-YYYY format, as shown in the original guide.
Enter the MRP intended for printing in the Sale Price field.
Enter the same MRP in the MRP field for barcode-label printing, as directed in the original instructions.
The source describes automatic product barcode numbers beginning with “10001”. These are software-generated identifiers, not proof of GS1 registration.
- Press Enter through other fields you do not need for this label workflow.
- Continue pressing Enter to open a new row if you need multiple batches of the same medicine.
- Click Save in the top-right corner to store the product details.
- Press Esc or click Close to return to the item list.
- From the Item List window, click Print Barcode Label.
Pharmacy safety: Batch, expiry, tax and medicine label information may be legally required. Do not use the sample values or optional-field shortcuts without checking your product's requirements.

Select Medicines and Print Barcode Labels
- Select “As per Opening Stock Main Unit” from the available print options.
- Click OK to display the medicines and batches saved in Medicine Master.
- Tick the checkbox to the left of every medicine or batch you want to print. You may select multiple products together.
- Enter the required number of labels in the Qty column, then press Enter so the yellow quantity editing box changes to white.
- Click the Print button at the top-right of the screen.
- Select a suitable label Design Template. Different templates display different layouts. The original Barcode Label Designs Ready available page contains examples.
- Click Preview and confirm the medicine data, batch, expiry, price and other details are displayed correctly.
- If details are wrong, return to Items, double-click the medicine, edit the record and click Update. Repeat the print-preview steps.
- If nothing appears in the preview, check that the required medicine was ticked and that a quantity was entered and confirmed.
- In the preview, click the small printer icon in the top-left corner to print the sticker.
The original print screen also includes billing and invoicing controls; these are not part of the free label-printing instructions, so focus on selecting a template, previewing and printing.


What a Medicine Label Can Include

- Batch number
- Expiry date
- Medicine name
- Medicine business name
- Medicine business contact numbers
- A unique barcode image for each batch, as described in the source
- Generic name or manufacturer brand
- Dosage details and advice that can be edited at print time
- Additional customized fields and design variations
Any dosage or medicine advice printed on a label must be checked against authorized dispensing instructions. This website is about label formatting, not prescribing or deciding doses.
Printer Selection and Label Size Settings
The original instructions describe using the default Windows printer. To select a specific printer, set the appropriate device as default in Windows Devices & Printers (or the equivalent printer settings on your Windows version).
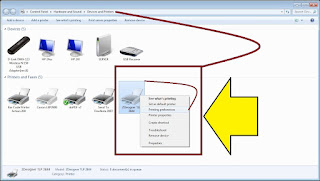
Normal Laser, Desk-Jet or Ink-Tank Printers
- Use ready-made A4 adhesive sticker sheets with pre-cut labels suited to the artwork.
- See the original A4 barcode label sticker sheet sizes and purchase information.
- A4 is a common paper-size default, as referenced by the original A4 Sheet Size link. Verify actual paper size and page settings before printing.
Thermal Barcode Label Printers
- For thermal-transfer labels, set the actual label width and height in the printer driver's Printing Preferences.
- Match the software label template to the roll or sheet size.
- Print a test label and verify barcode readability, placement and margins before printing many labels.
Customize Existing Label Templates with Crystal Reports
The software uses Crystal Reports for its existing label layouts. It stores editable .rpt report files in the software's Report folder. Edit these files only if you understand Crystal Reports and have a backup of the originals.

Useful Label Editing Resources
Download a suitable report template or edit an existing one as required for your business. The original guide notes that you can use a single design template to print labels for unlimited products.
Custom design assistance was quoted in the supplied page at approximately ₹500–₹2,000 per design, depending on complexity. Contact the business to confirm current pricing.
Map an Additional .rpt File in Report Builder
The original guide also links to Free Pharmacy Billing Software for barcode use during invoice creation.

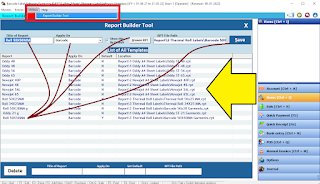
- Download the required .rpt file and copy it into Barcode Printing Software > Report folder.
- Open Tools > Report Builder from the software menu.
- Enter the name you would like to see in the barcode-label printing menu.
- Choose Barcode under Apply On.
- Tick Select Default, if this template should be the default.
- Click Browse and select the new .rpt file from the Report folder.
- Click Save and close the Report Builder screen.
- If required, open the .rpt file in Crystal Reports and adjust its text size or design. The source compares its editing controls to a word processor.
Read the Full Crystal Report Software Guide for further instruction.
Video: How to Edit a Barcode Label
Free Self-Service and Optional Design Support
According to the original page, the supplied label-printing software and available designs can be used free when you follow the written instructions and videos yourself. A Windows computer and printer are needed. Customized label design services can be requested separately for a charge.
For WhatsApp support or label customization, contact 9727955514. The business also offers a separately licensed billing software product; its invoicing functions are not included in the free label-printing workflow.
Download the Software and Explore Other Pharmacy Solutions
Thank you for reading the complete guide to pharmacy barcode-label printing.